Monday, February 13, 2012

Crocheting a Beanie for the Crochet-Inept


Have you ever looked at something ADORABLE and thought, "I can crochet that!" only to look at the instructions and feel like you are trying to read Japanese, or Russian, or something akin to hieroglyphics? Yep. That's me. I try to follow along and end up with a mess. A MESS, I tell you! I made a super cool beanie with a beard attached for my brother's birthday a couple of weeks ago...but can't get the picture to upload from Facebook. Grr. Trust me, it was cool! Anyway, that super cool and simplistic beanie was a beast to make. It took me three days to complete...because I had to rip it apart and crochet it SIX DIFFERENT TIMES! Yep. You read that right. So, my husband suggested while I was in the middle of a tirade about the stupidity of crochet-crypt that I write a tutorial on my findings. A "Crocheting a Beanie for Morons" if you will. Since I am one. :) Ready? I hope I can help someone.

Gather your supplies!
I am using a 5mm weight yarn because it's what I have on hand. It's pretty generic and easy to find, mine is by Red Heart.
I am also using a J 6mm crochet hook. It's my go-to hook and I pretty much use it on everything. I know that I shouldn't, but I don't really care. ;) It makes me happy because it works on pretty much EVERYTHING. :)

**DISCLAIMER**
I STINK at all of the counting that crocheting entails, so I will be omitting most of the counting and judging everything by eye. I honestly think that I am numerically dyslexic--anything involving numbers usually leaves me in tears wondering where I went wrong, so I just avoid it when at all possible. :) So this tutorial may be of help to people like me.


Okay, first thing you need to do is make an overhand or slipknot. I only recently started using a slipknot, either will work, trust me. Then you will start chain stitching. This is done by pulling the yarn that is attached to the skein around the back of the hook, hooking it and pulling through the loop that is already on your hook. Make any sense?


Do this five times and you will have five chain stitches.
Tada! Now, rotate that back around and put your hook through the first chain, then pull the yarn from around back again and pull through. This will make a circle.

Now, you are going to do what is called an increasing stitch. This consists of doing two double crochets inside one stitch. Are you lost yet? lol Wrap your yarn around the hook, then insert your hook into the nearest chain to the left. Wrap the yarn again and pull it through ONE loop of yarn...this would be the chain you just went through. You will now have three loops of yarn on your hook. Like so:
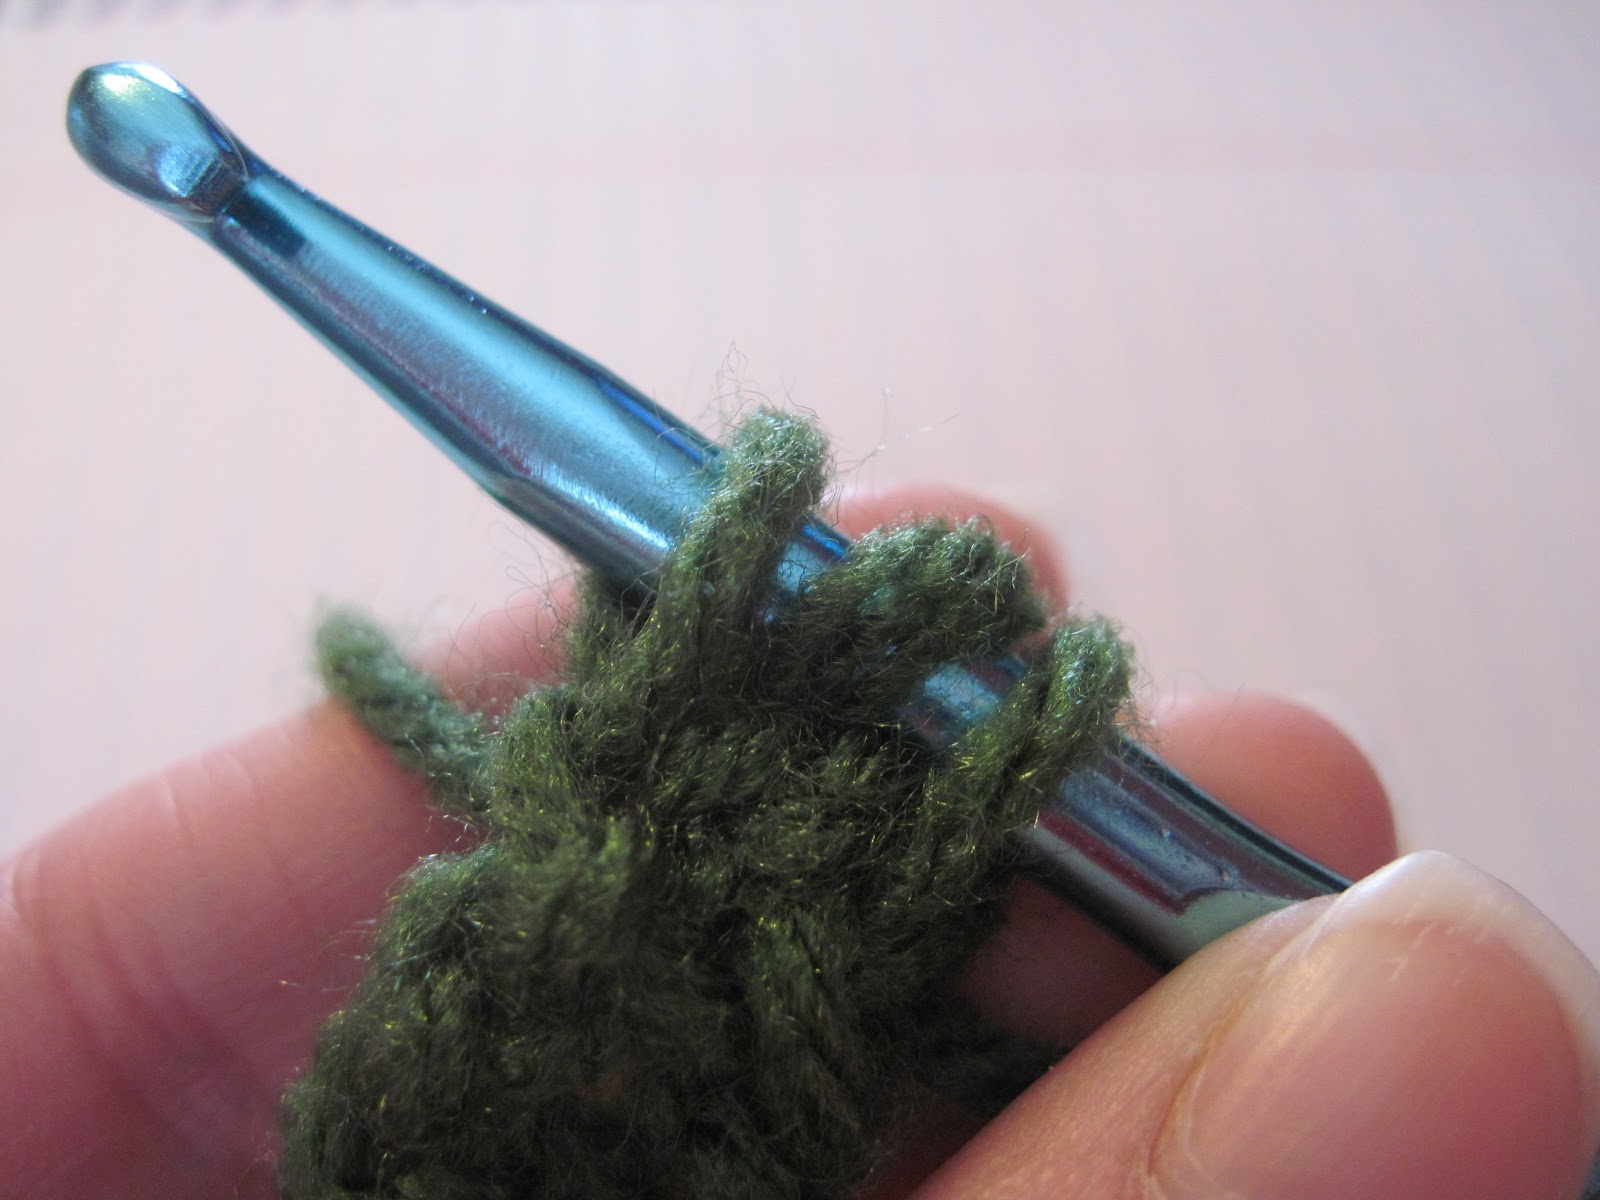
Now You are going to wrap your yarn around again and hook/pull it through the first TWO loops. It will magically leave you with two! See?
Wrap, hook, hook and pull through those two loops (at one time) and your first double crochet stitch is done!
Now, repeat those steps in the same chain and you will get this:

Repeat those steps all the way around the circle and get this:

Start the process again in that next chain (always work to the left) for another full circle, giving you two "rows". You can do three rows of this stitch, if you like. I don't feel like crocheting is an exact science; if it were, why are there SO MANY different tutorials? lol Here is where it starts to get a little confusing. On your next row, you will start a pattern of stitches: One double crochet in a chain, two double crochets in the next chain, one double crochet, two double crochets...Making sense?
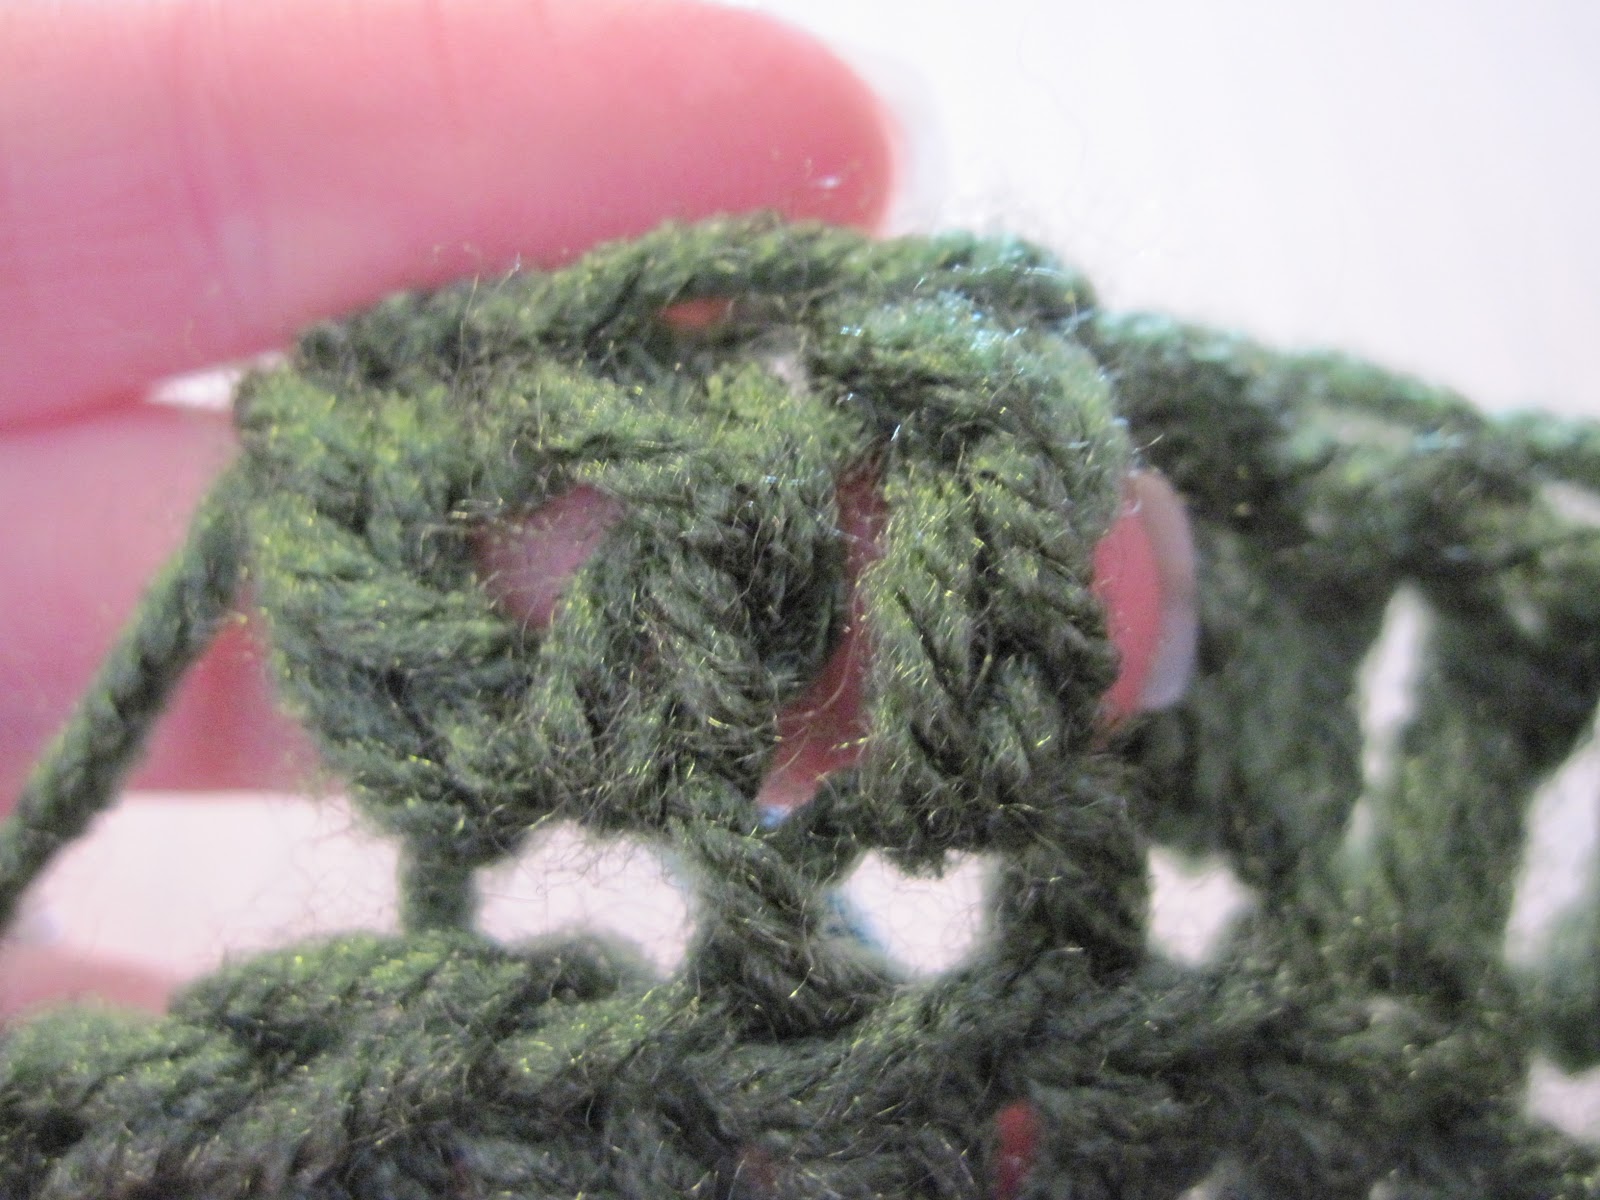
Can you see the stitches? Look down there in the chains. Keep stitching away at the crown, this is the top of the hat. Four rows typically makes an infant/child's sized hat. My hubby has a big head and seven rows works well on him. However, this also depends on the size hook/yarn you use, so you will have to keep in mind that it may vary. This is what the crown will start to look like:
When your crown is the size you need, you can start doing just one double crochet in each chain, this will stop increasing the crown and you will see it start to form a tube after a few rows. I made 8 rows on my hubby's, but didn't finish it off because I was a dummy last time and didn't count how many rows fit him properly before I gave the hat away. So he will get a beanie with a skein of yarn attached tomorrow. ;) It looks like this right now:

I don't know why it won't turn the right way. lol Feel free to ask my any questions! I am still new at this process too, so I'm definitely not an expert! Happy hat-making!!

Saturday, February 11, 2012

Valentine's Day Massacre

I am working on a new tutorial on crocheting and I apparently need to study it myself. Or invest in a good pair of earplugs. My sweet daughter loves to talk to me. I mean. Loves. To. Talk. Period. She also loves to drag her baby sister around. Sweet feta cheese. Anyway, the tutorial is on crocheting a hat, which works well because my hubby wants one really badly and I thought I would be a sweet wife and make him one for Valentine's Day. <3 I know. I am so wonderful! ;-) I wish I could show you the epic hat that I made my brother for his birthday. It is one of those with a cool beard attached. However...it is on my phone and won't translate to Blogger. Grr. You will just have to use your imagination. Anyway, I began working on this hat around noon today and they are fairly simple, you just have to pay attention to what you are doing pretty closely for the first few rows. Well, I messed the darned hat up really quickly and had to rip out a few rows and start over. Oh well. No big deal, right? Well...I then proceeded to mess something else up and not notice because of my little chattering maniac for another TEN ROWS. Anyway...life has gone downhill from there today--Kirsten is now screaming for her daddy because her ear hurts...I suspect an ear infection. I hope whoever might be reading this is having a better day than we are.

Friday, February 10, 2012

For the love of cheese! (A tutorial)

As most of my friends know, I LOVE food! I also LOVE cooking and LOVE gourmet food! One of my very favorite foods of all time is a lovely snack which I have always referred to as, "Feta Cheese Puffs". Oh my. Just a minute, I am salivating. Okay, back to business. Would you like to see a picture so you can salivate as well?
Beneath the flaky crust made of phyllo dough is a creamy, cheesy center. I can hardly think about it without craving them! What is phyllo dough, you may ask? You may read about it's yumminess here on Wikipedia. Since we are educating ourselves on the food we are making, here is a link to the all-fabulous feta cheese. Yep. Wipe your chin, you are now drooling. Oops...that's me. Sorry! Shall we begin?

Gather your ingredients!
Phyllo Dough (found in the freezer section of your favorite grocer. They don't carry it? Find a new favorite.)
Feta cheese (found in the gourmet cheese section, often near the deli. Don't look where you buy shredded cheddar. It's not there.)
1 egg
Olive oil
Salt and pepper
Parsley flakes

Gather your supplies!
A knife or pizza cutter
Pastry brush
Bowl for mixing filling
Fork (for stirring ;) )
Baking sheet (I prefer Pamperd Chef's stoneware, but any old sheet/pan will do)
Preheat your oven to 350*F

First, you will need to crumble your feta cheese if it came in a block. I prefer to buy mine in a solid block, rather than pre-crumbled, because it comes out cheaper per ounce. Crumble half of the block into a bowl, making sure that your crumbles are nice and small. Add some salt, pepper, and parsley flakes, I have no idea how much, I do mine by taste. Stir in your egg. Your filling is done! Doesn't that sound delicious, not to mention healthy?!


Next, you will work on your dough. It is basically edible tissue paper and is very fragile. Make sure you let it defrost completely (but don't put it in the microwave!) before unrolling, or you will get a broken mess like I did.

Yep. I was too impatient/hungry to wait and ended up with a mess this time around. Does it look like I care, though? Nope. They were tooooo tasty! ;)

Put some olive oil in a little dish and whip out your pastry brush. Brush your olive oil onto the dough so it is covered evenly, but don't soak it. You can use melted butter too, but olive oil goes on better since it doesn't need to be hot. PLUS, it is healthier. It honestly tastes the same. Believe me. I would bathe in butter if I could.

You need a total of three sheets of phyllo and you are ready to cut! The rectangle shape will make four strips, as you can see in the above photo. Make sure you cut from the middle and divide into four pieces that way so they are more even. Unlike mine. You can now drop a SMALL forkful of the cheese mixture onto the end of one and get ready to fold. Make sure it is about a teaspoon worth, or your puffs will not get nice and crunchy outside. Begin to fold them like one would fold an American flag...
See? Pretty. :) When they are all folded up, line these little beauties up on your pan and bake for about 8 minutes until they are a golden brown color and the dough is light and flaky like the first photo. Let cool for a few minutes--if you can bear the wait!--and EAT! I was in too raptureous of a state to remember to take a picture of one with a bite out of it. I mean, come on--it's CHEESE!!! So you will just have to find out for yourself. ;)

In conclusion, I hope anyone reading this enjoys this recipe as much as I do! If you do, leave me some love! <3

Wednesday, November 30, 2011

Elastic? Fantastic! (A Tutorial)

So, I tried to post this blog entry last night and Blogger threw a technical fit and deleted it. ::head:desk:: Anyway...If you hate pulling elastic through casing with a safety pin as much as I do...read on!

I recently heard of a super easy way to elastisize your clothes. I know. It's not a word. :) I used 1/4" elastic here, so I made my casing 1/2". Iron your casing to the proper size, then put the end of your elastic inside and do a few stitches/backstitches to secure it.

 Now just keep your elastic against the crease you ironed and sew the casing shut, being cautious not to catch the elastic in the needle's path.
Leave about an inch of your casing open to give you working space. Puuuuuullllll that elastic until you like the fit, do a few stitches/backstitches, clip the elastic and sew the casing shut! Voila! Sorry...forgot to take more photos, but I think you get the idea. Isn't that awesome? I kept shaking my head and wondering why I had not figured this out years ago. Now get over to your sewing machine and make your kiddo something cute! Happy sewing! :)

Sunday, November 27, 2011

A Christmas Project With Kirsten

I decided today that it would be so sweet to have Kirsten make a gift for Norah and for Norah to have a handmade item to give to Kirsten. Kirsten and I searched the www for a doll softie and found this one from Sweet Tidings. It is just too cute, don't you think?
I like the face on her doll better, but here is a picture of the one that Kirsten and I made.

I'm pretty proud of her! I think she looks like a little babuska. :) I figured I woul give a mini tutorial (my very first) on how I assembled my doll...here goes:

After cutting out each piece, I began with her head. Under Wonder the face piece to one head piece. Don't forget your stitch and tear on the back or it will come out wonky like mine. :/


Luckily, it ironed flat...
*whew*

Here are the setting I use on my machine for applique projects:
And my model:


After putting the face together, I assembled her arms and decided to make sleeves so she wouldn't be cold.
Kirsten helped me stuff the little lady. <3

See? Arms!

I then proceeded to sew the arms to the body like so:

Oh, before you do this, attach each part of the head to the top of each body part. This way, you can sew the entire body together when you attach her arms. Just leave the bottom of her skirt open to put her feet on.
Almost done! Now hand sew her hair on (I just made cute little x's that made it look like she has pigtails) and paint on her face, then add a scarf and boots. Isn't she darling? :)
I am thinking of doing a tutorial on applique because I had a horrible time finding a good one when I first started. Is anyone interested?

Friday, November 25, 2011

The Holidays Make Me Crazy [Happy]!

It's official! It's the most wonderful time of the year! After a CRAZY and exciting day yesterday full of food and blitz deals at Walmart like this one:
(I only had to wait in line for 2 1/2 hours for this one!) my day has been no less crazy today. Norah slept pretty long this morning and woke up with a fever of 102.1. Fabulous. After being sick and taking some infant Tylenol, her temperature dropped to a healthy 98.7 in an hour and a half. Praise the Lord! We are hosting another Thanksgiving meal tomorrow evening (after a full morning of Christmas play practice) and I started the cheesecakes only to realize that I ran out of sour cream days ago. Doh! SO...Ryan went to the store to pick some up for me. Thank, honey! I decided to finish putting the lights on the Christmas tree while he was gone and the girls were curled up in front of "A Charlie Brown Christmas". (<3) This is what the tree looks like now:

See that bare spot in the middle? That, my friends, is a strand of lights that went out half way and won't be fixed. Wonder of wonders, our two spare strands are also the same way. After testing each bulb and replacing the fuses...I came to the conclusion that it will have to be replaced. Reindeer poo. A quick call to Ryan to pick up another pack of lights, as well as more Air Wick inserts since our house smells like a strange combination of tree, Mr Clean, popcorn, and cinnamon pine cone. I am going to crank those suckers high tonight and *pray* that they overpower the funky mixture by 6 pm tomorrow. LOL

Anyway, Norah's first Thanksgiving was a blast for her! She loved picking up baby carrots and green beans and munching away. <3 Kirsten had a fabulous time, too! She loves all of the holiday rushing around and she really loves dancing to Christmas music. :) Well...I had better get to cutting up some fabric to make a present for a birthday party that is Sunday afternoon. Maybe I will just do it tomorrow night? lol Happy Thanksgiving!!!

Thursday, November 17, 2011

Slow-going

Okay...so I tried to get my wrap done--I really did! My good friend Charity came over and we cut up all that DELICIOUS fabric into the appropriate widths and began sewing with vigor! Charity got her wrap finished...I...did not. HOWEVER, it was not due to laziness! My machine needs to be cleaned and oiled BADLY and is making HORRIBLE noises. So much, in fact, that I am afraid to sew anything else for fear of hurting poor Matilda. I have always referred to my machine as "her", as if she is a personality, I decided today that I think the name "Matilda" suits her. Don't get too attached, though. It could change at any moment. So, I have decided to inclue some photos of my GORGEOUS Amy Butler fabric that I procured for the BARGAIN price of $3.00 per yard. That's right, folks...$3.00 PER YARD!! :-D Can you sense my excitement? ;-) Here you go...drool away...


Yummy!!! <3

I don't know why this one self-rotated to portrait...The blue is going to be a panel in the middle for added visual interest. :)

The fabrics together. They are much prettier when seen in person.
Hopefully I will get my machine in working order soon! I have a LOT to do before Christmas! For now, I guess I will get down and dirty...which means cutting out patterns. I hate that part. At least it will all be done and all I will have to do is sew! :) I think I will start on some new Christmas stockings first. I have had some pretty gold fabric for a few years that has been screaming to be turned into something lovely! I think it's time to sacrifice it on the craft alter...LOL

Happy crafting!!!

Wednesday, November 9, 2011

Ruffled Scarf Tute

Since my blog entries are sporatic (at best) I am going to attempt to be more *regular* at posting. haha Here goes...

After seeing Ashley's tutorial for a ruffled scarf here at Make It and Love It, I decided to give it a whirl! It only took me a week--during which I painted the girls' bedroom and the living room, not to mention attempted to organize our house after our move, attend the funeral of a dear friend,  etc, etc, etc... ANYWAY.....Here are the results!


I just love how the ruffles fall so effortlessly...can you believe that this scarf was only recently a pair of gouchos that made me shriek, "What was I thinking when I wore these things?!" But it was too much fabric to just throw away...right? I've not worn them in almost five years and now they are being put to use once more. :)

Now...onto hanging some decor on the wall...or maybe cutting the fabric for my new baby wrap?? Can't decide...Whatever I do, I will *hopefully* post tomorrow! Stay tuned... ;)

Sunday, January 16, 2011

Going Crazy

I think the residents of my house are going a little batty. Here's why: Ryan has been in Texas on a business trip since Monday. He doesn't return until Friday...five more days. (Breathe. Just. Breathe.) The first few days are what I thought would be the hardest; I was wrong. Days one and two: Kirsten and I both cried a lot, when I cried, she would pat my cheeks with her sweet little hands and tell me, "Don't cry, Mommy, Daddy will be home soon." Which, of course, made me cry harder! To think that my child was the one comforting me instead of me comforting her... Ryan being gone has been so hard on all three of us. We are so close-knit and have never been apart more than 72 hrs since Ryan and I started dating 5 years ago this month. Oddly, each day that goes by gets harder. Kirsten gets crankier and begs for Ryan to come home (who can blame her?!) which makes me crankier because I am trying to reason with a three-year-old. Reasoning with a pre-schooler is NEVER successful. Ever. Bribes (candy, snacks, a special toy, etc) only work for so long. lol Today my heart broke when I picked Kirsten up from the church nursery and she ran to the sanctuary screaming, "DADDY, DADDY, DADDY!!!" in excitement. Having to remind her that Daddy wasn't here wasn't fun. Her little face dropped, but the tears were abated when she saw her best friend, Izzy. *Whew!* Crisis averted. The dog and cat miss Ryan, too. For the first three nights, the dog slept by the front door and the cat was posted at the front window staring out of it. I assume they were waiting for him to come through the door. They have since taken up their normal space in the bed with me, but they both get up and wander downstairs a lot in the middle of the night. I feel bad for my sweet husband; here I am with our daughter to cuddle and hug when I cry, but he only has his work friends who miss their families, too.
I know I've rambled a lot...kudos if you've gotten this far. lol

Tuesday, November 23, 2010

My Little Turkey!

After I worked SO hard on this project, Kirsten decided that she didn't want to put the outfit on so I could photograph her. Little turkey. HOWEVER, once I got it on her, my little turkey performed like a HAM!! I used a tutorial I found at The Cottage Home to make this shirt and put my own twist on it! Here it is!!!


This ADORABLE clip was inspired by Ashley's adorable embellished tee over at Make It and Love It. Thanks for the inspiration, Ashley!!! Now my little turkey/ham is ready to celebrate Thanksgiving in one-of-a-kind style!!! Sorry for the poor photography...the sun has gone down and we're in our living room. *sigh* Oh well.