Monday, February 13, 2012

Crocheting a Beanie for the Crochet-Inept


Have you ever looked at something ADORABLE and thought, "I can crochet that!" only to look at the instructions and feel like you are trying to read Japanese, or Russian, or something akin to hieroglyphics? Yep. That's me. I try to follow along and end up with a mess. A MESS, I tell you! I made a super cool beanie with a beard attached for my brother's birthday a couple of weeks ago...but can't get the picture to upload from Facebook. Grr. Trust me, it was cool! Anyway, that super cool and simplistic beanie was a beast to make. It took me three days to complete...because I had to rip it apart and crochet it SIX DIFFERENT TIMES! Yep. You read that right. So, my husband suggested while I was in the middle of a tirade about the stupidity of crochet-crypt that I write a tutorial on my findings. A "Crocheting a Beanie for Morons" if you will. Since I am one. :) Ready? I hope I can help someone.

Gather your supplies!
I am using a 5mm weight yarn because it's what I have on hand. It's pretty generic and easy to find, mine is by Red Heart.
I am also using a J 6mm crochet hook. It's my go-to hook and I pretty much use it on everything. I know that I shouldn't, but I don't really care. ;) It makes me happy because it works on pretty much EVERYTHING. :)

**DISCLAIMER**
I STINK at all of the counting that crocheting entails, so I will be omitting most of the counting and judging everything by eye. I honestly think that I am numerically dyslexic--anything involving numbers usually leaves me in tears wondering where I went wrong, so I just avoid it when at all possible. :) So this tutorial may be of help to people like me.


Okay, first thing you need to do is make an overhand or slipknot. I only recently started using a slipknot, either will work, trust me. Then you will start chain stitching. This is done by pulling the yarn that is attached to the skein around the back of the hook, hooking it and pulling through the loop that is already on your hook. Make any sense?


Do this five times and you will have five chain stitches.
Tada! Now, rotate that back around and put your hook through the first chain, then pull the yarn from around back again and pull through. This will make a circle.

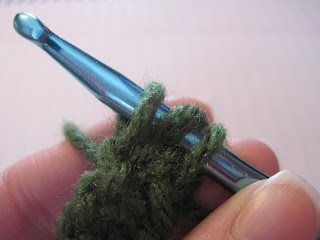
Now, you are going to do what is called an increasing stitch. This consists of doing two double crochets inside one stitch. Are you lost yet? lol Wrap your yarn around the hook, then insert your hook into the nearest chain to the left. Wrap the yarn again and pull it through ONE loop of yarn...this would be the chain you just went through. You will now have three loops of yarn on your hook. Like so:
Now You are going to wrap your yarn around again and hook/pull it through the first TWO loops. It will magically leave you with two! See?
Wrap, hook, hook and pull through those two loops (at one time) and your first double crochet stitch is done!
Now, repeat those steps in the same chain and you will get this:

Repeat those steps all the way around the circle and get this:

Start the process again in that next chain (always work to the left) for another full circle, giving you two "rows". You can do three rows of this stitch, if you like. I don't feel like crocheting is an exact science; if it were, why are there SO MANY different tutorials? lol Here is where it starts to get a little confusing. On your next row, you will start a pattern of stitches: One double crochet in a chain, two double crochets in the next chain, one double crochet, two double crochets...Making sense?
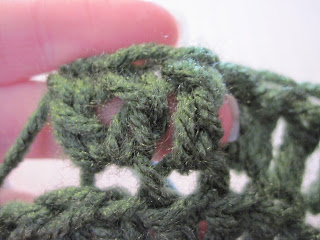
Can you see the stitches? Look down there in the chains. Keep stitching away at the crown, this is the top of the hat. Four rows typically makes an infant/child's sized hat. My hubby has a big head and seven rows works well on him. However, this also depends on the size hook/yarn you use, so you will have to keep in mind that it may vary. This is what the crown will start to look like:
When your crown is the size you need, you can start doing just one double crochet in each chain, this will stop increasing the crown and you will see it start to form a tube after a few rows. I made 8 rows on my hubby's, but didn't finish it off because I was a dummy last time and didn't count how many rows fit him properly before I gave the hat away. So he will get a beanie with a skein of yarn attached tomorrow. ;) It looks like this right now:

I don't know why it won't turn the right way. lol Feel free to ask my any questions! I am still new at this process too, so I'm definitely not an expert! Happy hat-making!!

Saturday, February 11, 2012

Valentine's Day Massacre

I am working on a new tutorial on crocheting and I apparently need to study it myself. Or invest in a good pair of earplugs. My sweet daughter loves to talk to me. I mean. Loves. To. Talk. Period. She also loves to drag her baby sister around. Sweet feta cheese. Anyway, the tutorial is on crocheting a hat, which works well because my hubby wants one really badly and I thought I would be a sweet wife and make him one for Valentine's Day. <3 I know. I am so wonderful! ;-) I wish I could show you the epic hat that I made my brother for his birthday. It is one of those with a cool beard attached. However...it is on my phone and won't translate to Blogger. Grr. You will just have to use your imagination. Anyway, I began working on this hat around noon today and they are fairly simple, you just have to pay attention to what you are doing pretty closely for the first few rows. Well, I messed the darned hat up really quickly and had to rip out a few rows and start over. Oh well. No big deal, right? Well...I then proceeded to mess something else up and not notice because of my little chattering maniac for another TEN ROWS. Anyway...life has gone downhill from there today--Kirsten is now screaming for her daddy because her ear hurts...I suspect an ear infection. I hope whoever might be reading this is having a better day than we are.

Friday, February 10, 2012

For the love of cheese! (A tutorial)

As most of my friends know, I LOVE food! I also LOVE cooking and LOVE gourmet food! One of my very favorite foods of all time is a lovely snack which I have always referred to as, "Feta Cheese Puffs". Oh my. Just a minute, I am salivating. Okay, back to business. Would you like to see a picture so you can salivate as well?
Beneath the flaky crust made of phyllo dough is a creamy, cheesy center. I can hardly think about it without craving them! What is phyllo dough, you may ask? You may read about it's yumminess here on Wikipedia. Since we are educating ourselves on the food we are making, here is a link to the all-fabulous feta cheese. Yep. Wipe your chin, you are now drooling. Oops...that's me. Sorry! Shall we begin?

Gather your ingredients!
Phyllo Dough (found in the freezer section of your favorite grocer. They don't carry it? Find a new favorite.)
Feta cheese (found in the gourmet cheese section, often near the deli. Don't look where you buy shredded cheddar. It's not there.)
1 egg
Olive oil
Salt and pepper
Parsley flakes

Gather your supplies!
A knife or pizza cutter
Pastry brush
Bowl for mixing filling
Fork (for stirring ;) )
Baking sheet (I prefer Pamperd Chef's stoneware, but any old sheet/pan will do)
Preheat your oven to 350*F

First, you will need to crumble your feta cheese if it came in a block. I prefer to buy mine in a solid block, rather than pre-crumbled, because it comes out cheaper per ounce. Crumble half of the block into a bowl, making sure that your crumbles are nice and small. Add some salt, pepper, and parsley flakes, I have no idea how much, I do mine by taste. Stir in your egg. Your filling is done! Doesn't that sound delicious, not to mention healthy?!


Next, you will work on your dough. It is basically edible tissue paper and is very fragile. Make sure you let it defrost completely (but don't put it in the microwave!) before unrolling, or you will get a broken mess like I did.

Yep. I was too impatient/hungry to wait and ended up with a mess this time around. Does it look like I care, though? Nope. They were tooooo tasty! ;)

Put some olive oil in a little dish and whip out your pastry brush. Brush your olive oil onto the dough so it is covered evenly, but don't soak it. You can use melted butter too, but olive oil goes on better since it doesn't need to be hot. PLUS, it is healthier. It honestly tastes the same. Believe me. I would bathe in butter if I could.

You need a total of three sheets of phyllo and you are ready to cut! The rectangle shape will make four strips, as you can see in the above photo. Make sure you cut from the middle and divide into four pieces that way so they are more even. Unlike mine. You can now drop a SMALL forkful of the cheese mixture onto the end of one and get ready to fold. Make sure it is about a teaspoon worth, or your puffs will not get nice and crunchy outside. Begin to fold them like one would fold an American flag...
See? Pretty. :) When they are all folded up, line these little beauties up on your pan and bake for about 8 minutes until they are a golden brown color and the dough is light and flaky like the first photo. Let cool for a few minutes--if you can bear the wait!--and EAT! I was in too raptureous of a state to remember to take a picture of one with a bite out of it. I mean, come on--it's CHEESE!!! So you will just have to find out for yourself. ;)

In conclusion, I hope anyone reading this enjoys this recipe as much as I do! If you do, leave me some love! <3